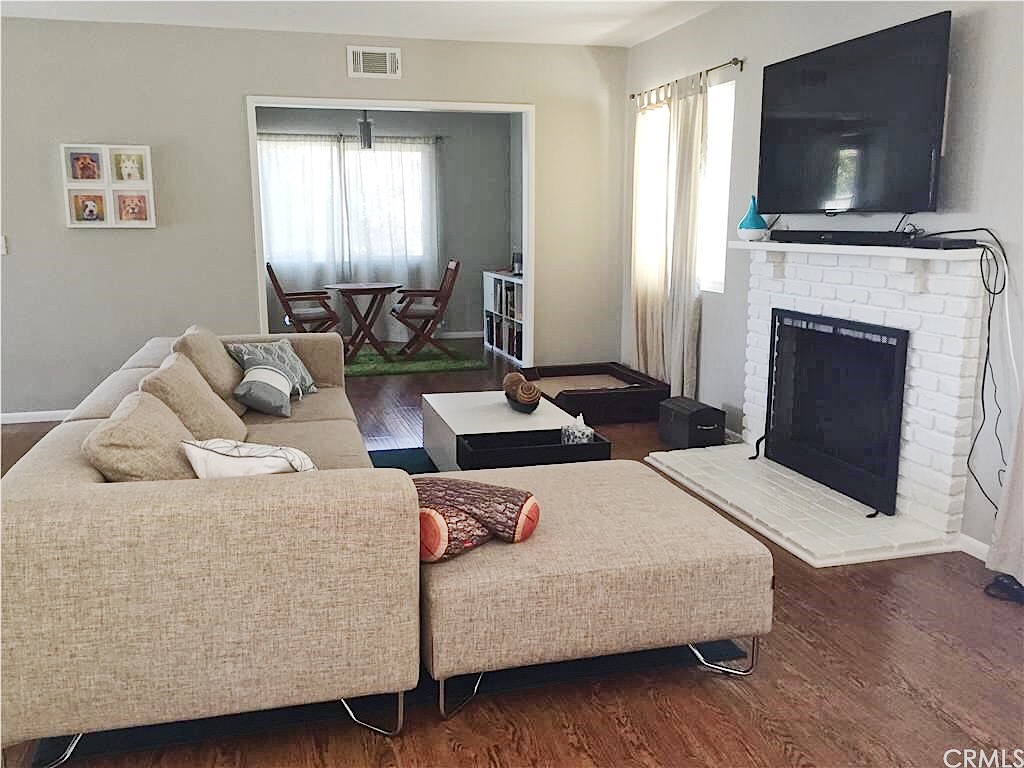
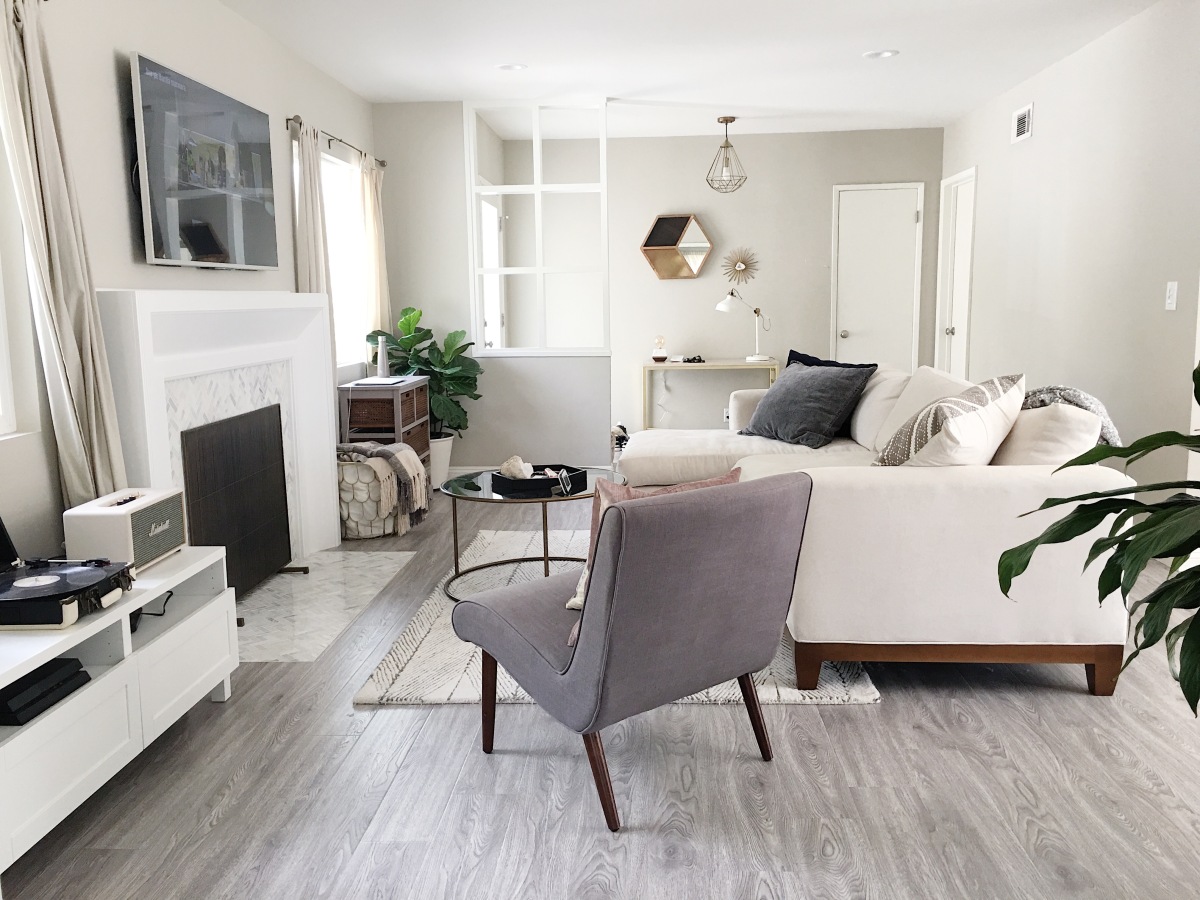
Hi friends! I’m back today with some before and after pictures of our living room. I know I told you guys I’d “clean the entire house” in my last post which, let’s face it, was a massive joke on my part. Then, I decided I won’t be showing the bedrooms for a while because they’re all still a work in progress anyway. In other words, they’re not very pretty to look at. We’re also planning on renovating our main bathroom when we’re out of the broke zone. I cringe at our bathroom vanity every time I use it. It will be a total tear down, a major makeover, a dreamy-as-hell bathroom, and it will have wallpaper. WALLPAPER. I. Can’t. Wait.
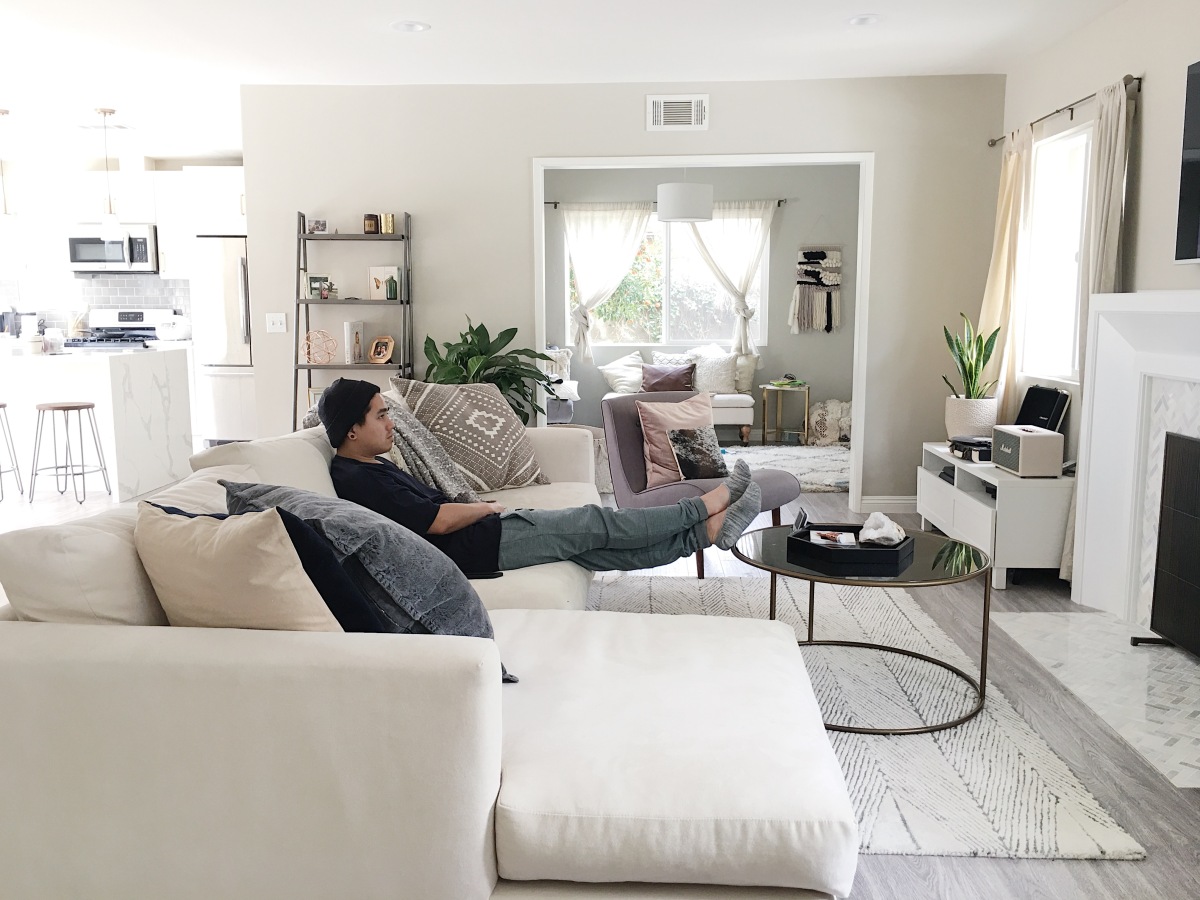
Anyway, here are some before and after pictures of the living room, Noey’s playroom, and the dining area. The before pictures were taken when the previous owners were still living in the house, hence the furniture you see that I would not choose. Also, please excuse my husband for being in the pictures. He refused to move because he was too busy watching his game show that morning.
I know what you’re thinking. “Why in the world would you get an ivory couch?!” And trust me, I’ve heard it all.
“You’re not worried Noelle is going to stain it?”
“You’re going to regret getting a light colored couch!”
“Light colored furniture and kids don’t end well together.”
Is there some unwritten rule that people with kids are not allowed to have nice home decor?! Look, I’ve thought it through (for a whole five minutes at SofaULove) and my want for an ivory couch overpowers my fear of staining it. I’ll cross the bridge when I get there. In my case, I’ll worry about the stains when the stains come. Plus, we chose microfiber which, according to the sales lady, is easier to clean. Here’s to hoping. Lol.
You’re probably thinking we’re finished with the makeover, but finished we are not. We’re waiting on window treatments and the entryway is still lacking something. Suggestions are welcome, especially if you love to decorate your home!
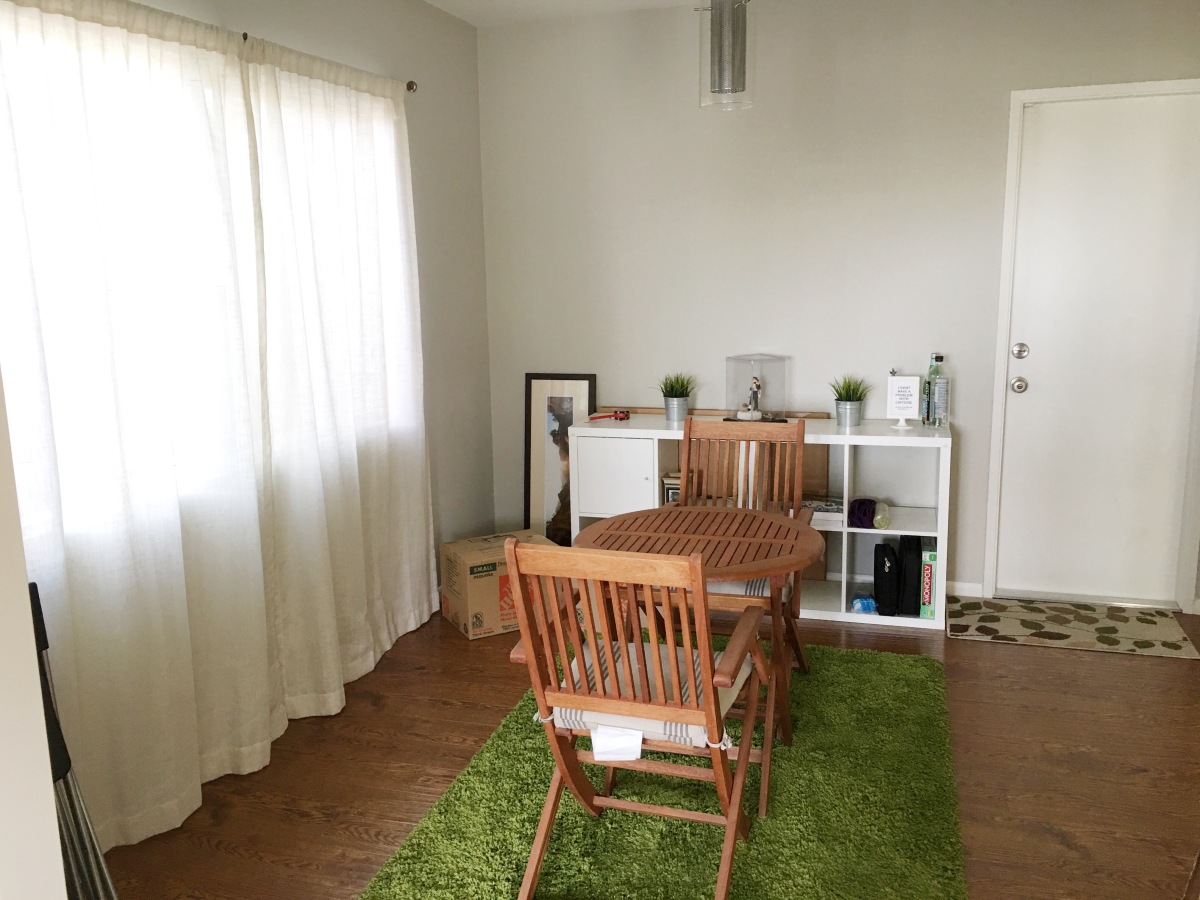
Here is Noey’s playroom. Please note that her playroom is usually filled with really COLORFUL toys that hurt my eyes and my soul. It is never clean and will never be clean after I’ve taken this picture. I also added an old rug (that everyone and their mom has) for her crawling needs. Not shown in picture below, but shown in above picture where hubby is sitting on the couch.
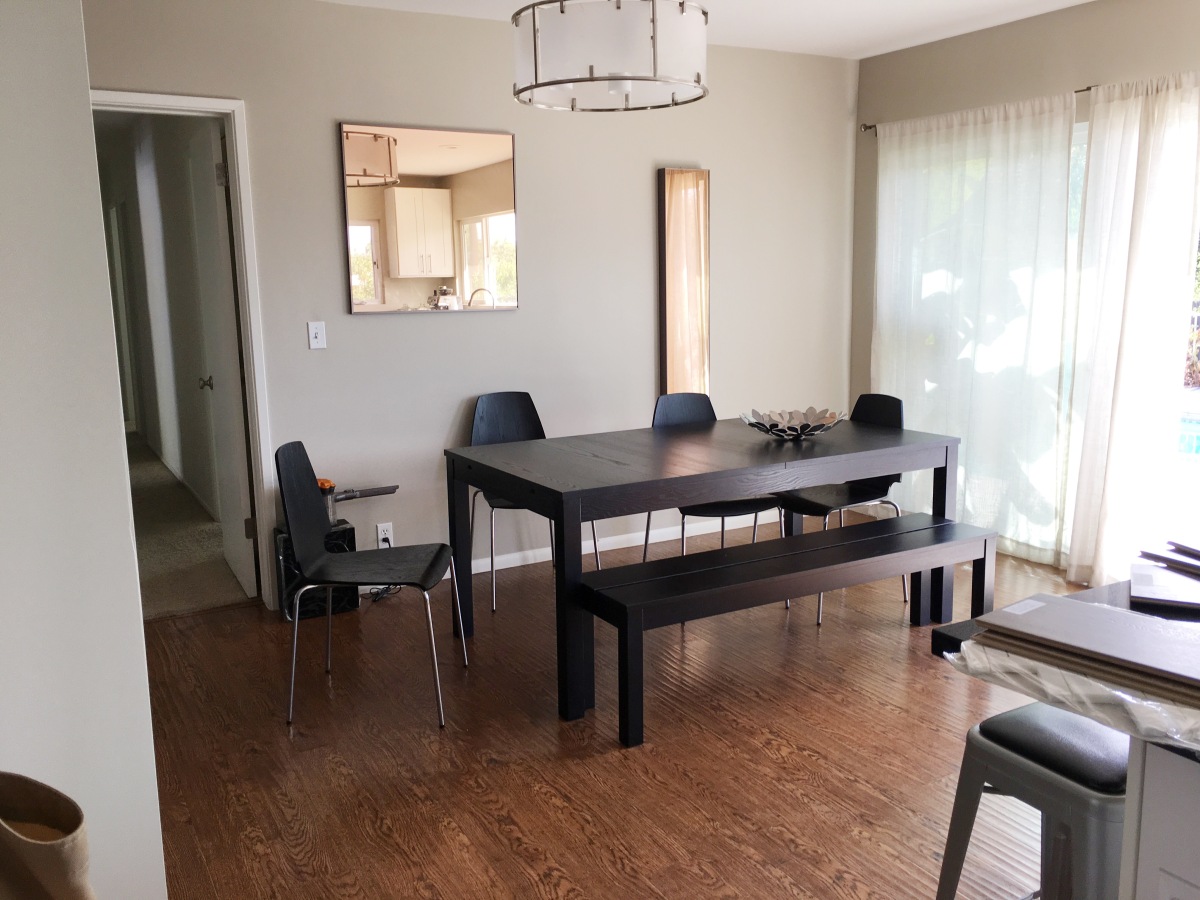
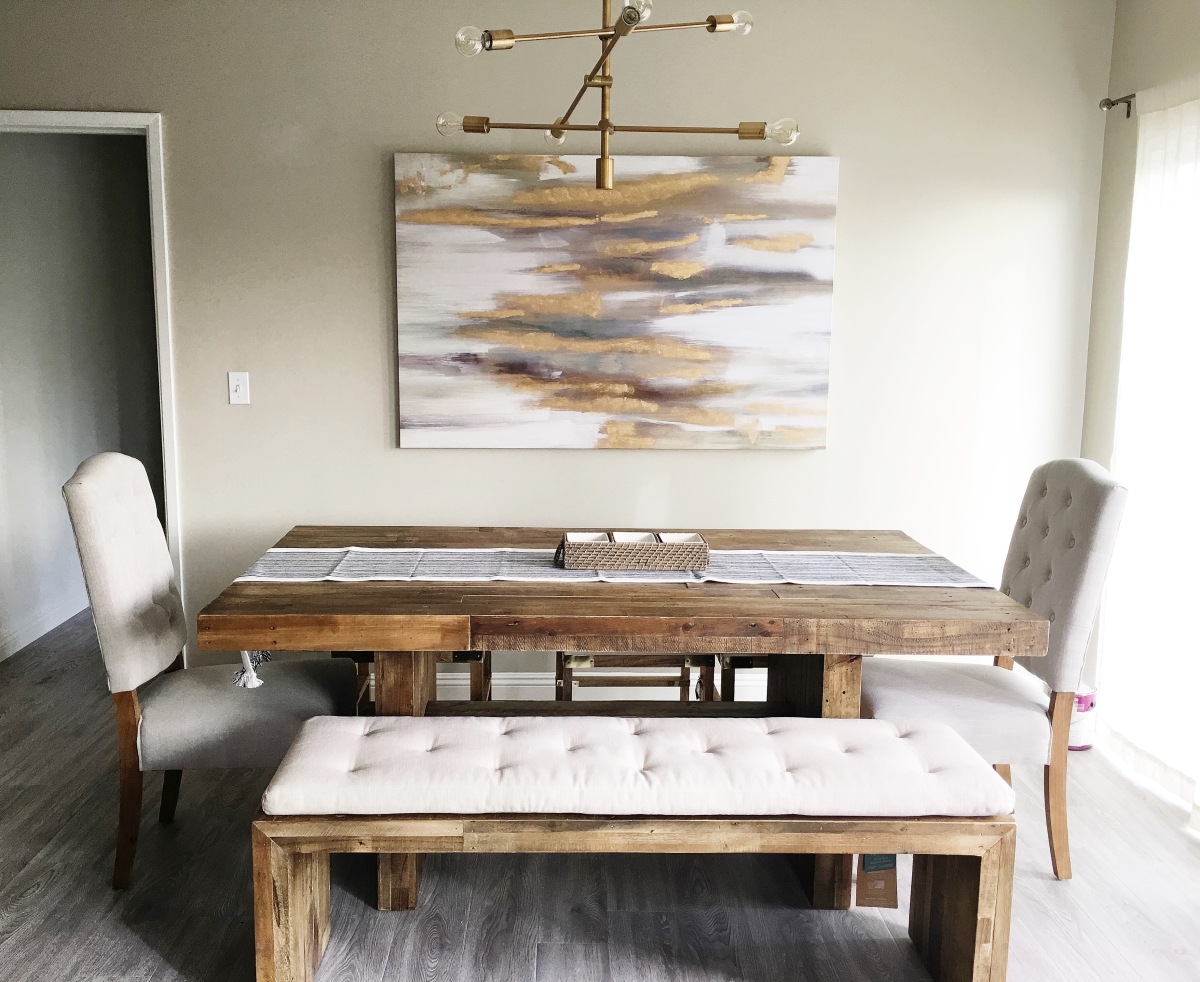
The dining area. Our dining table, bench, and light fixture were purchased at West Elm. Side Chairs from Home Goods. Three individual stools (that I totally forgot to take pictures of) are from last season Target by Nate Berkus. I don’t know how long I spent looking for the perfect dining chairs for the ends of the table, but I got extremely lucky to have found a great match from Home Goods. Home Goods is my go-to for home decor.
Pictures of the makeover in progress.
And the rest.
Hope you guys enjoyed this post. I know I’m not the only person who enjoys seeing before and afters of home renos. If you want to know where I bought a specific item, comment below, tweet me, snapchat me, whatever! Let me know if you like, love, hate, or don’t care. See ya!
Noelle had her 9 month HepB and Polio shots this week and she did really well. There was minimal crying. I was about to let her taste a lollipop that was in a jar by receptionist’s desk, but she said I “shouldn’t because she’s too young”. Lol, oops.
California is pouring rain again, but I’m not complaining. I love the rain.
My house is a mess. I need to buy caution tape because it could be considered a danger zone. Please. Send. Help.
Noelle is starting to crawl. Not a pro yet, but getting there!
I’m starting a diet. Will get into more details in the future.
Valentine’s Day was awesome. Hubby surprised me with a laptop that I’ve been wanting since mine has been broken for over a year. He got me an HP Spectre 360, then I exchanged it to a Dell, then I exchanged it again for a Macbook Air. I tried loving the Dell (because I am a Windows lover), but performance was horrible. Typing from my Macbook Air right now.
I still have one more blog post on the house reno. I just need to clean the entire house and take some pictures. I’m aiming to post next week. Please be patient with me!
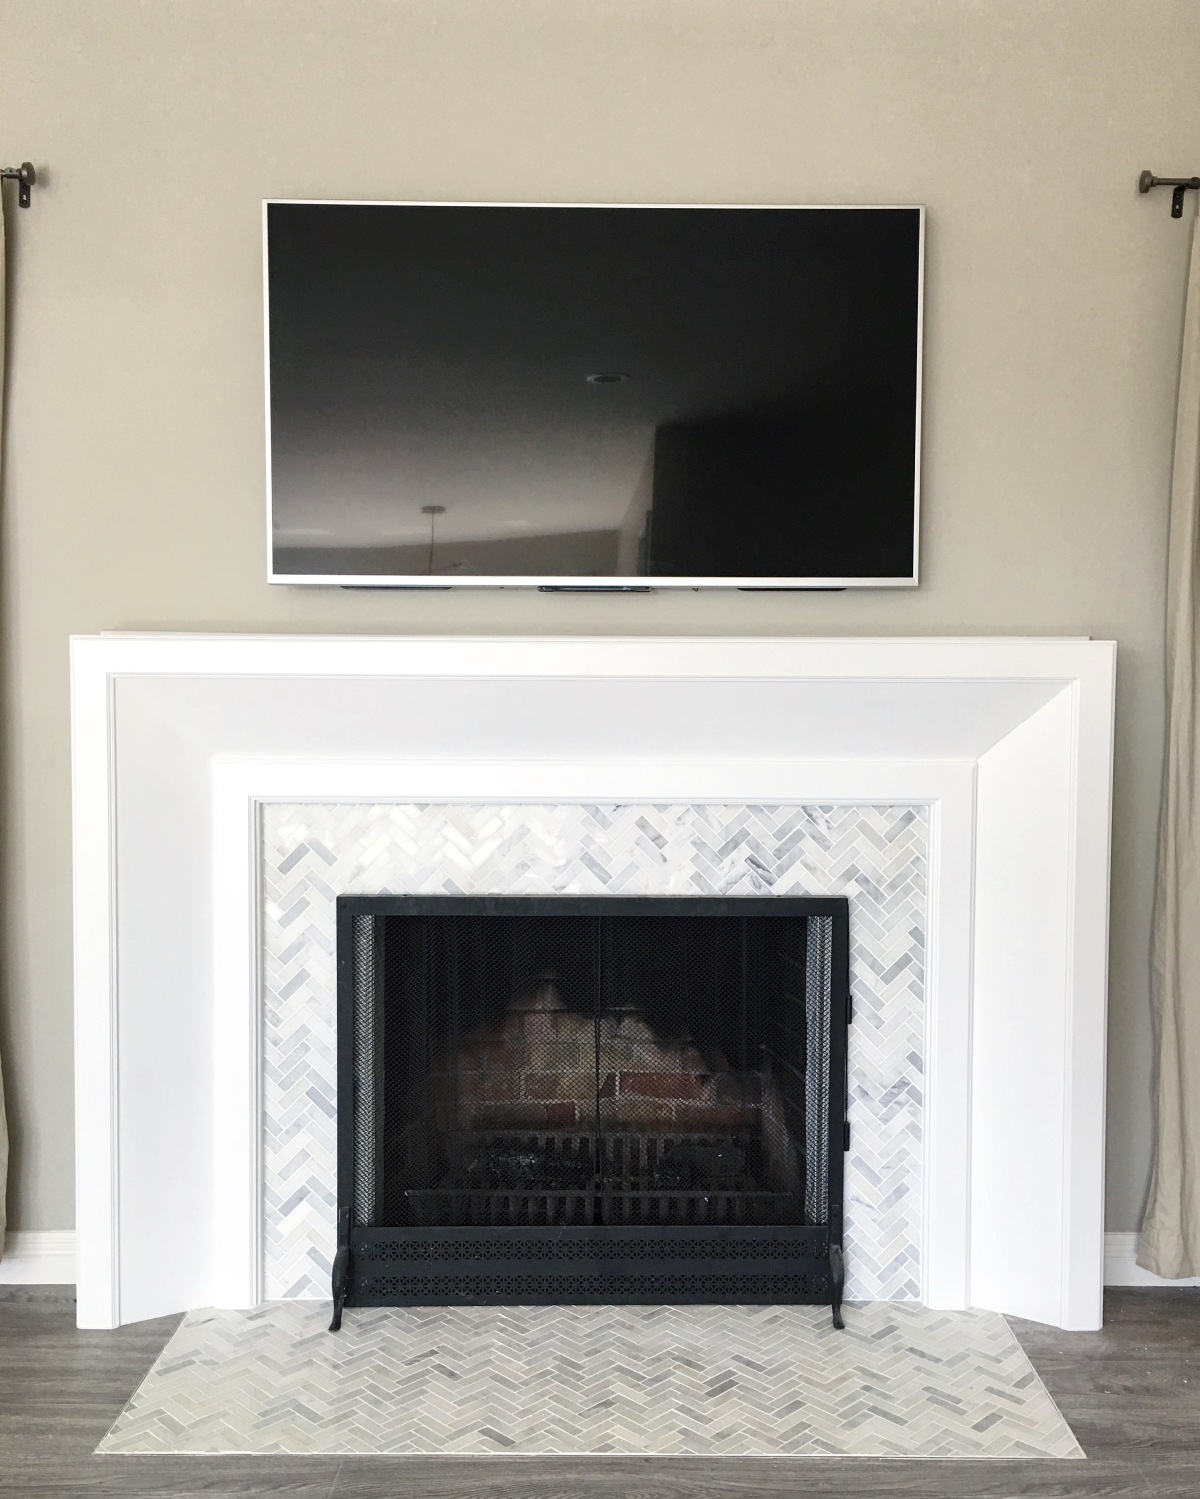
When I envision my dream home, I’ve always known I wanted some type of herringbone element somewhere in it. Whether it be the wooden floors, the kitchen back splash, or the bathroom tiles, I LOVE the interesting design of herringbone. If it was aesthetically acceptable, I would probably apply herringbone to every part of my home where it was possible. This is where Pinterest became my best friend (as it is for most women). I searched and came across this beautifully tiled fireplace. A herringbone tiled fireplace, heck yes. Wait no, hell yes. Let me tell you guys something special: this tile is pre-made and can be found at your local Lowes. It was a very easy find. For our fireplace, we needed about 20-25 slabs. The brand is called allen + roth and it can be found here.
Here are the images I found on Pinterest. I wanted the tiling of the first photo with the mantel/surround of the second photo. Apologies for the blurriness of the second photo.
I didn’t want the surround to look overly fancy, because our house is not big enough for a grand sized fireplace. So, I decided to stick with something clean, has straight edges, and no fuss. I knew a fireplace with a raised edge could cause Noelle to trip when she starts walking, so I requested the tiling on the floor to be flush with the laminate flooring.
Here’s the before and after.
Before AfterI think my contractor pretty much nailed it. The surround was custom made by a third party company that specializes in fireplace mantels and surrounds. All I had to do was wave my stubby little finger and text him those sample pictures. Stay tuned for one more house makeover post. Hope you enjoyed!
I am back today with exciting news! After two long months of signing papers, sending requested documents, and late night phone calls with our agent (and blood, sweat, and tears somewhere in between) I am so happy to announce that Franco and I are officially homeowners! We are so excited to share this milestone with all of our close friends and family, and you guys! Everyone around us has been very supportive and encouraging and we feel very blessed. The day we got our keys was the day our home makeover started.
I feel very lucky to have found our contractor. He’s very pleasant to work with and likes to get things done very quickly (which Franco and I absolutely love). We had been living with my parents for about 6 months, so we wanted to move in to our new home as soon as possible. Franco and I are avid HGTV watchers and when we found our house, our dream of renovating a house to our liking was actually going to happen.
Let’s get started.
We initially and obviously wanted hardwood floors, but financially it wasn’t in the books for us. So, we went ahead and asked our contractor for samples of laminate instead. Not a bad substitute! Originally, we wanted to go a with something a little warmer, but ended up going with the gray wash knowing I can warm up the house with wood and gold furniture pieces.
Everybody’s ideal kitchen and bathroom is bathed with marble, but again, it is a heavy financial load. Quartz it was! We looked at what seemed like hundreds of different types of quartz until we were about to settle for something we weren’t 100% in love with. That is until our contractor showed us this large piece of breathtaking beauty. It was definitely love at first sight. The best part of this particular countertop is that it comes in prefab form. PREFAB is the best. Prefab is cheap. Prefab is a dream come true.
BeforeAfter
Let me just say, I am so smitten with myself. Granted this is not my absolute dream kitchen, but it is a smaller version of it and I am just so happy my choices came together pretty well. Can I go on?
We kept the shaker cabinets because they were still in great shape. The only thing I would change about them is the spacing at the ceiling. Not sure why the previous contractors who ordered the cabinets didn’t just make flush top cabinets. Boo.
Our fixtures are brass. Yes, brass fixtures. Can I die now? Since we decided to keep the cabinets, we wanted to change the pulls to brass as well. The measurement of the pulls were not a standard 6 inch, it included 1/4 of an inch, which is a little odd. Thankfully, we found beautiful brass pulls in that exact measurement! I remember our contractor was telling us, “Before, everyone wanted gold, then they all wanted silver, and now they want gold again.” Lol.
These are the pulls we found. I just love the subtle geometric base. They are called Berenson Swaggers and you can find them here.
Hideous before sinkDreamy after sink
I remember the first time I ever saw a farmhouse sink on Pinterest, I knew I needed to have it in my future home. Neeeeeded. A farmhouse sink does cost a little bit more than a standard sink, but hey, YORO (you only renovate once)…hopefully.
Hubby and I had a slight difference in opinion in backsplash choices. I wanted to go with monochromatic patterned tile, but it was too fancy for his liking. So, I had to settle for simple. Gray subway tile was the answer. You can’t go wrong with subway tile.
The faucet is made by Delta. You can find it at Home Depot or Lowes.
One more highlight of our kitchen…the island! My husband wanted a larger island with more space and an extended counter so we can have breakfast on it. He requested a waterfall style island. I was skeptical at how overly fancy it would look. Boy, was I wrong. Seeing as we didn’t have much walking space on one side of the island, our contractor suggested a one sided waterfall. It turned out so beautiful! He did such a wonderful job. Good call, babe!
What do you guys think? How did we do for our first kitchen makeover?
We’d love to hear your thoughts!
P.S. Stay tuned for another makeover post of the rest of our house!
In the last post, I left you off with a “I miss you, pre-baby body” and I thought today would be a good idea to introduce you to our five month old baby girl, Noelle.
“Boy or girl?” Although, I get that question all the time, I am never offended. You can’t blame ’em. I mean without her pink clothes, she does look like a little baby boy. My mom suggested I pierce her ears, but I refuse! Noelle can decide on her own whether she wants holes in her ears. In the beginning, she would only be covered in gray or ivory and as the months went by, my love for color grew..and very strongly at that. Color-loving is not a common trait for me, personally. I plan to shower her bedroom and playroom with lots of color!
Then there’s my husband. My husband has never been more in love in his life. His eyes light up at the sight of her. His very limited mornings are happily spent with her while I sleep and I don’t mind it one bit. Sometimes, he forgets to change her diaper though (well, all the time). Baby girl has already gotten started on her solids two weeks ago and she did very well! We started with mashed avocado mixed with formula for extra creaminess. She loved it. Her second food choice (actually, mommy’s choice) was oatmeal cereal, which she equally loved. She can roll from her back to her belly and then complains afterward because she realizes that she hates it. Insert eyeroll here. Everything she grabs a hold of goes straight into her mouth. She hates being talked to while she is being fed. Insert another eyeroll here. The ABC song is her favorite song up until the letter G and then she completely loses interest in listening to me sing. So maybe not a favorite? Pudge doing tricks makes her extremely happy. On the other hand, Pudge is completely disinterested in Noelle’s presence.
I know there is a lot more to talk about regarding my journey into motherhood, but I will pan this out into future blogs for as long and as much as I can. My real purpose into restarting my blog is to also document our home renovating project as well as home decorating. A new house?! Yes! There are exciting new things around the corner for our little family. Interior decorating and renos are somewhat of a hidden passion of mine ever since Franco has had his own place. Okay, fine. Ever since HGTV has become my worship channel. See you later.
Hi world! I can’t believe I’m back. It’s been about four years since my last post and it was about cupcakes. Cupcakes, guys. Like my love for cupcakes, some things haven’t changed but there are many additions and very exciting news as of late. Let’s start with mine and my husband’s wedding. Yes, I am still with the same dude, Franco and yes, we did gain the post-wedding weight together. May 31, 2015 was when we finally tied the knot. FINALLY. That word should have graced our wedding cake in cake topper form. What I remember most about our wedding was the planning. Oh god, the planning. Granted it was suppose to be “happy stress”, which it was (whatever the hell that means). Even with a wedding planner by my side, I wanted to pull my hair out and wring my own guts. Wedding day approached and I came down with a cold. Somehow, the cold miraculously went into hiding during the wedding and emerged full force the moment I hit the bed that night. Sadly, there was no post-wedding nookie which was perfectly fine with me and my new husband. Despite the shortcomings, our wedding was beautiful. I am still amazed and a little resentful at how fast it flew by. Franco and I couldn’t be more elated to be surrounded by our family and friends. We enjoyed every minute.
Fast forward 3 months, we decided to take a trip to New York with our close friends. It would have been considered our “honeymoon” since we didn’t plan one to begin with. A honeymoon with a group of friends sounded awesome, so why not. I had never been to New York and I’ve always wanted to be in Times Square, so you can imagine my excitement planning the trip. The week prior to our trip, I felt strange. Almost like I wasn’t myself. My period was a week late, which was occasionally normal so I casually brushed it off. A few hours before our red eye flight, I decided to stop at Trader Joe’s for some snacks and CVS just happened to be right next door. Hmmm, I thought, let’s just take a pregnancy test FOR FUN! I drive home, open some snacks, eat, and peed on the stick. Totally normal things to do before a flight, right? I left the stick in the bathroom and kind of giggled at myself for even doing this. I walked back into the bathroom 2 minutes later. Um, two lines. Let’s see what the manual says. “Pregnant”. What?! HOLY CRAP. Never have I been flooded with so many emotions in such a tiny period of time. I felt excited, scared, anxious, confused, ecstatic, and I had to tell someone. Of course, it would have to be my sister. This is the moment she has been waiting for. To become an auntie. I swore her to secrecy until I was definitely sure and of course, she struggled. I wanted Franco to know ASAP, but I did’t want to surprise him with the news by just blurting it out. FAIL. We were getting ready to land in NY when I couldn’t hold it in any longer. “Babe, I think I’m pregnant.” His eyes became so wide I thought they were going to fall out of his sockets. The bug eyes were followed by the biggest smile I had ever seen on his face.
Whoever said to me “You’re going to love being pregnant. I miss it so much!” can go jump off a cliff. Kidding. I’ll push you. Kinda kidding. It wasn’t long after I told Franco that I was pregnant when my morning sickness started to kick in. Did I say kick in? I meant overtake my soul and took every reason I had to live and shoved it down a deep dark hole. It was bad. I suffered vomiting, nausea, and tiredness every. single. damn. day for three months. Every single person who gave me tips to keep the morning sickness away can also jump off a cliff because nothing worked. My doctor was willing to prescribe me meds to control it, but I didn’t feel right taking it. I thought, hey if I’m not dead yet I’ll be fine. You would be surprised how quick nine months go by. One minute you’re enjoying a Charley’s sub sandwich at the mall and the next you’re in a hospital bed pushing a dark haired being out of one of the openings of your body. Oh and goodbye pre-baby body. I miss you.
I’ve seriously outdone myself. My parents had this brilliant idea of Thai Tea Cake, but it turns out that it has (obviously) already been thought of. None of the recipes online looked inviting so I decided to test myself. I kept track of all the measurements while I whipped up these beauties because I knew that I was definitely going to want to share my version with my fellow thai tea lovers.
Thai Tea Cupcakes with Condensed Milk Frosting
Notes…
You will need a cloth strainer or coffee filter in order to make the thai tea. I prefer a cloth strainer.
Ground thai tea leaves can be found at any Thai Supermarket.
This recipe yields 18 standard sized cupcakes.
You Will Need…
2 cups of all purpose flour
1/2 cup (1 STICK) plus 2 tablespoons of unsalted butter
1 1/2 teaspoons of baking soda
1 1/2 teaspoons of baking powder
1 cup of sugar
1 teaspoon of vanilla extract
1/2 teaspoon of salt
2 large eggs
1/2 cup of ground thai tea leaves (Brand used: CHA THAI)
3 cups of water
And For The Frosting You’ll Need…
1/2 cup of condensed milk
1 stick of unsalted butter
2 cups of confectioners (powdered) sugar
2 tablespoons of milk or heavy whipping cream
Pinch of salt
Make Your Thai Tea First…
1) Bring water to a boil and add the tea leaves to the water. Leave to boil on low to medium heat for 15-20 minutes.
2) Strain tea with cloth strainer into a separate bowl and let it cool.
3) Pour 2/3 cup of tea into measuring cup then add evaporated milk to fill up to 1 cup. Mix thoroughly.
Prepare…
Preheat oven to 350 degrees
Line cupcake pan with liners
Let’s Get Started On The Cake Batter…
1) Sift flour, baking powder, baking soda, and salt together in a bowl.
2) Beat sugar and butter in electric mixer on medium speed for 3 minutes or until light and fluffy.
3) Add eggs and vanilla to the butter until fully incorporated.
4) Add flour mixture and thai tea alternately 5 times into the mixer (on low) making sure it is fully mixed after each addition. (flour, tea, flour, tea, flour)
5) Scoop batter into cupcake cups about 2/3’s full.
6) Bake for 12-15 minutes.
7) Let the cakes cool completely.
To test if your cakes are done, stick a toothpick in one! If it comes out clean (or with a few dry crumbs), you’re good to go!
Now For The Frosting..you’re almost done!
1) Beat butter and condensed milk in mixer on high until fully incorporated.
2) Add powdered sugar (1 cup at a time) and milk (or heavy whipping cream) mixing thoroughly
3) Sprinkle in your pinch of salt and mix thoroughly.
4) Top your cupcakes with the frosting.
Frosting note: I wanted my frosting to have a more ganache consistency so I only used half a stick of butter. Remember, you can make your frosting however you like! If you prefer soft frosting add more milk. If you prefer a more firm texture frosting add more powdered sugar.
This past weekend my boyfriend’s cousins decided to have somewhat of a housewarming party at the new apartment. I’m so glad Franco decided to move out of his studio and get a 2-bedroom unit. Moving into a new place always calls for a celebration or more like an excuse for drinks! A gathering with his cousins always means three things: games, drinks, and my favorite, FOOD. I had a blast watching them play King’s Cup, or at least their version of it. I’m definitely getting in on the game at the next gathering. My favorite subjects were (obviously) the kiddos. Here are some snapshots from my new Sony NEX-7. That’s right, my new baby.